Quilt care basics: cleaning, use and storage

IMG_8770

Jelly Star (detail) pieced by Barb Gorges, Cheyenne, Wyoming, and quilted by Virginia Ohr, Buffalo, Wyoming. Photo by Barb Gorges.

Recently, I was invited to write 700 words about quilt care for the Wyoming Tribune Eagle (Cheyenne, Wyoming) as part of the publicity for the Cheyenne Heritage Quilters’ quilt show Aug. 16-18, and mention my book on Amazon, “Quilt Care, Construction and Use Advice: How to Help Your Quilt Live to 100.”  It was published Aug. 11, 2018. It was also published at Wyoming Network News, https://www.wyomingnetworknews.com/tips-on-quilt-care-in-time-for-heritage-quilters-annual-show-quilt-care-basics-cleaning-use-and-storage

I used the article as the basis for a talk for the Slater Women last week, a social group that has been meeting for over 70 years in Slater, Wyoming, south of Wheatland. 

Think of this article as a synopsis of my book. 

Quilt care basics: cleaning, use and storage

By Barb Gorges

Do quilts at the fair and the local quilt show this time of year have you thinking about the quilts at your house? Here’s the most important care advice I can give you.

Cleaning

For art quilts, fragile antiques and other than cotton quilts, consult an expert.

Make repairs to quilts before attempting any cleaning procedures. Test vividly colored fabrics by rubbing them with a damp white cloth to make sure no color comes off when wet. If it does, don’t wash without a “color catcher” laundry product.

Smelly quilts don’t necessarily need washing. Try airing them on a bed by an open window, on the lawn between sheets or in the dryer with a damp, colorfast towel, just on air, no heat.

Washing a quilt contributes to wearing when surfaces rub against each other. But dirt, including body oils from hands and chins, also contributes to wear.

A quilt in good shape with lots of quilting holding the layers together can be washed in a washing machine. If you have a top-loader, stop the machine when the agitation begins and substitute gentle agitation by hand for a few minutes. Forward the machine to the draining, spinning and filling part of the cycle, until you reach the agitation part again and do it yourself again.

If you have a front loader, put it on the hand wash cycle. Be very careful with commercial machines because they may be encrusted with oil or excess soap.

Avoid using laundry aids like bleach and fabric softener. Look for laundry soap without additives, like Orvus, available at quilt shops.

Be careful taking the quilt out of the washer. The wet weight can break quilting stitches and seams.

Spread an old sheet on the floor, preferably on colorfast carpet, and carefully unfold the quilt, squaring it up. In our dry climate it should dry overnight. Then fluff it a little in the dryer on low heat.

Use

Keep the quilt in a clean place—no smoke, grease, pets, food, etc.

When you make the bed, don’t tuck in the quilt. Lift it into place instead of tugging on one end of it. Fold the sheet up over the top edge to protect it from body oils.

Make sure sunbeams don’t shine on the same spot of the quilt every day. Consider closing the shades. Or make sure the quilt is repositioned often so all parts get equal light exposure. Folded quilts on display need refolding often.

Quilts can be displayed on a wall. Avoid nailing or tacking them up. Instead, check the Internet (or my website, www.GorgesQuiltLabels.com) for how to make a quilt hanging sleeve. The tubular sleeve is attached to the back of the top of the quilt. A pole can be inserted and the ends of the pole secured to the wall.

Hanging quilts need to be taken down to rest every few months and rotated with other quilts or displays.

Storage

Quilts should never be in contact with raw wood, such as shelves or cedar chests. Either finish the bare wood or cover it with other fabric. Plastic storage containers marked #2 or #5 are O.K. as long as the quilt is perfectly dry and the container doesn’t get damp. Forget mothballs.

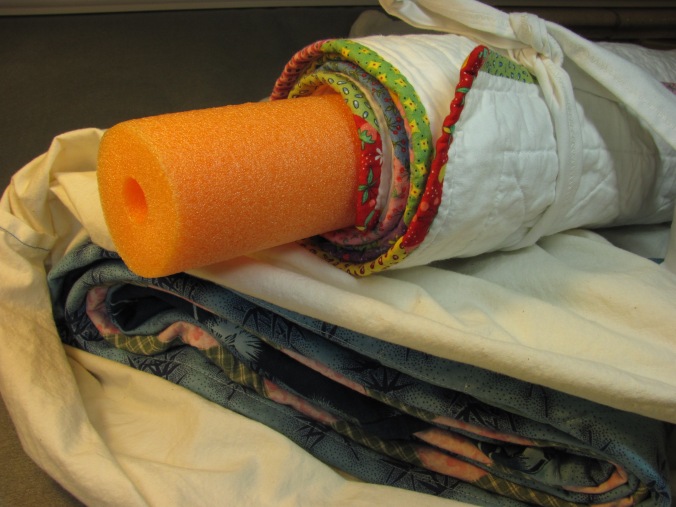
Never fold a quilt perfectly in half. Try to fold it differently each time or roll it up to avoid permanent creases.

Store quilts at “room temperature.” Extreme cold or heat is hard on cotton fibers.

Appraisals, Insurance

Photograph all your quilts. Make and sew on each quilt a fabric label with all the information you know about the quilt printed in permanent ink.

Getting quilts appraised for replacement value and insuring them is good practice, especially if you made the quilts yourself. It may also help future owners—like your kids—cherish them more.

However, the biggest compliment a quiltmaker can receive is that the quilt is loved to pieces.

Quilt Care eBook and print books on Amazon

Dear Quilters, Quilt Owners and Readers,

I’m happy to announce that three editions of “Quilt Care, Construction and Use Advice, How to Help Your Quilt Live to 100” are now available on Amazon (if these links don’t work in the future, just search my name, “Barb Gorges”:

The eBook edition, $4.95, eBook link, can be downloaded onto any device, phone, tablet, reader or laptop. If you don’t have a Kindle, you’ll see a link right there for a downloadable free app on the same page that says “Read with our free app.”

The B & W edition, $6.95, black & white edition link, is perfect for sending along with the quilt you just made for someone. Be sure to read the chapter on shipping before mailing your gift quilt. This edition has 32 black and white photos.

The full-color edition, $14.95, full-color edition link, has a slightly different title, the addition of the words “Full-color edition.” The 32 photos in color will help you visualize what I’m talking about.

And what am I talking about? The book is based on the columns I wrote for the Wyoming State Quilt Guild’s newsletter and posted here. The information has been updated with the assistance of Jeananne Wright, AQS-certified quilt appraiser and antique quilt expert. And the topics have been realigned into 12 chapters. The first two are of interest to quiltmakers and the other 10 to all quilt owners.

Make – Quiltmakers need to think about quality materials and techniques when constructing a quilt.

Test – How do you test for washability and light-fastness of fabrics for those special quilts?

Use – What’s the best way to make a bed with a quilt?

Display – Keep fading even if not absent; learn stress-free way to hang a quilt.

Air – Sometimes all a quilt needs is a little airing.

Wash – What do you need to know before you wash a quilt?

Dry – Air-dry or machine-dry, it’s all about the balance between abrasion and migration.

Store – Where to find a clean, unlighted place for your quilt to rest.

Appraise – Showing a homemade quilt is worth something could encourage future owners to take better care of it.

Insure – A quilt is an investment, in time and effort, if not money. Protect it.

Ship – There’s much to consider when shipping a quilt to a show or its new owner.

Sign – Find out how to make a label about the quilter and the quilt to sew on the back. The more information, the more important the quilt could become in the future.

Find out more about the book at https://yuccaroadpress.com/. And consider leaving a comment or review there or on Amazon.

Thanks,

Barb Gorges

Sign quilts for posterity

2017-01quiltsigningbybarbgorges16

A quilt documentation label should include quiltmaker’s name, date, location and occasion for making the quilt. Photo by Barb Gorges.

How to Help Your Quilt Live to 100, Part 16

By Barb Gorges

In the previous 15 columns I have touched on topics relating to quilt construction, care and use that will hopefully help your quilt make it through several generations.

I have one final suggestion for you, a reiteration of my first column: Sign and date your quilt.

Recently, my cousins had to decide what to do with their now deceased parents’ belongings. I made the parents a quilt and so I told my cousins that if there were any quilts they didn’t want, to please send them to me.

I am happy to report that they did keep several quilts, including the one I made, but they shipped two quilts to me.

I was pleased to have quilts that belonged to my aunt and uncle. But neither quilt came with any information. Since neither my aunt nor uncle made quilts, I was left wondering whether one of my ancestors had made them, or my aunt’s. She was related to me by marriage.

One quilt was obviously a Lone Star made by Native Americans and most likely presented to my aunt in the 1950s when she was a public health nurse at the Fort Berthoud reservation in North Dakota.

But the other is a scrap quilt with no name, no date—and it needs repairing. If my aunt’s mother made it, I could save it for my cousins’ kids. But more likely, the day my children deal with my quilt-making legacy, that quilt will end up on the discard pile, or as a dog’s blanket since it is one of those homely scrap quilts only a direct descendant or quilt historian could love.

Even if your quilts aren’t getting passed down through your family, your name on the quilt you made will make it more likely it will be taken care of. The less anonymous the quiltmaker is, the better.

The more information you provide on a label on the back, or embroider somewhere, the better. Include your name, date, location and occasion for making the quilt. It will make it more likely your quilt will be cherished, even 100 years from now.

This is the last of a 16-part series available at http://www.GorgesQuiltLabels.com.

Insuring Quilts

2016-09quiltinsurance14-2

This baby quilt was lost for seven weeks between Wyoming and New Jersey. The quilt was not appraised so quite likely the shipper would have only paid the cost of materials to make it, though producing an appraisal of a similar quilt I made might have increased it to the amount I insured it for. Photo by Barb Gorges. 

How to Help Your Quilt Live to 100, Part 14

By Barb Gorges

As quilters, most of us tend to undervalue the quilts we’ve made. But if you purchase something for your home that costs $500 to possibly several thousand dollars, wouldn’t you want your home owner’s insurance to cover it if it were stolen or lost due to fire or flood?

In addition to quilters undervaluing quilts, so do home owner’s insurance companies. They equate them to a purchased bedspread.

To get more appropriate coverage, you must have your quilts appraised (as we discussed in my last column), or at least have a few of the important ones you’ve made appraised to get a sense of the expertise of your work.

If you purchased an antique quilt, the bill of sale will help value it. But family antique quilts will need to be appraised.

No insurance company is going to pay a claim without proof of value. Document all of your quilts: exact size, materials and techniques used, and photos of details and the entire quilt front and back.

Store a copy of your quilt records somewhere safe away from your house—in the digital cloud or your safe deposit box on a flash drive and/or in print.

You need to contact your insurance company to see if they will cover your quilts, perhaps with a rider, as they would art or jewelry. If they will, be sure you get the terms in writing. If not, ask them for a recommendation for another company.

Maria Elkins experienced losing a quilt (and getting it back), which led her to set up the website http://lostquilt.com where information about missing quilts can be posted. She also has more detailed information about insuring quilts.

Maria mentions an insurance agent who writes policies for quilts. It is the same woman a Cheyenne, Wyoming, quilter friend bought a short-term policy from to insure her quilt while it was being shipped to and from and exhibited at the International Quilt Festival in Houston.

It will take time to document your quilts if you aren’t in the habit of doing it after completing each one. But in addition to helping with any insurance claims, it will give you a great sense of accomplishment to look back at all your work.

Valuing Quilts

2016-07QuiltValueBarbGorges13

This American Quilter’s Society appraisal is filed in a safe place with a photo of the quilt. Photo by Barb Gorges.


Valuing quilts: How to Help Your Quilt Live to 100, Part 13

By Barb Gorges

Have your quilt professionally appraised. Attaching monetary value to it may help keep it in better condition over the years. After all, if the next owner of the quilt (your friend or relation) has a copy of the appraisal in hand, they might decide their dog will enjoy sleeping on a $30 store-bought comforter just as much as a handmade quilt valued at $1000.

There are different kinds of appraisals. The one most quilters want is replacement value, the value you give to your home owner’s insurance company or when shipping the quilt. It is not figured the same way as market value.

If the quilt’s pattern is popular, made from a well-known quilter’s book or kit, replacement might be as simple as finding one for sale. So replacement value would be close to market value. But otherwise, replacement value is the cost of remaking the quilt, including the cost of materials and the cost of labor. A quilt made by a prize-winning quilter will be valued higher—one would need to hire a quilter with equivalent workmanship skills and that would cost more.

The American Quilter’s Society’s certified quilt appraisers have the best credibility should you have to put in an insurance claim. While there are none in Wyoming, there are several in surrounding states or you may be able to make appointments with them at quilting events. See http://www.americanquilter.com/ under “Resources.”

The cost of a quilt appraisal can be $50—about the same as four yards of batik. But if you have ever lost a quilt, you know how small a price that is.

Storing Quilts

2016-05QuiltStorageBarb Gorges12

A queen-sized quilt is folded on the bias lengthwise, about 2 feet wide, and then rolled and inserted in a custom-made pillow case. A wall quilt is loosely rolled on a swim noodle and tied in place with a fabric strip so it can stand upright in a closet. Photo by Barb Gorges.

Storing quilts: How to Help Your Quilt Live to 100, Part 12

By Barb Gorges

The best way to store a quilt is flat, in the dark, protected from dirt and interactions with chemicals, and at “room temperature.” Layering a few quilts on your guest bed comes close, especially if you lay old sheets between them.

However, most of us have to compromise with textile collection standards. I fold my big quilts, but I try to fold them in unprecise thirds or on the bias, differently each time. I don’t want to end up with that permanent crease down the middle that is seen in so many antique quilts. After folding them in one direction, I often roll big quilts in the other direction, then put them in extra-long pillow cases I make for each quilt, either out of cheap, washed muslin or the quilt’s fabric leftovers.

For small quilts, I use a swim noodle that is longer than the quilt is wide, or other cylinders covered in batting and muslin scraps. I roll the quilt around it, tying it loosely with a couple leftover fabric strips. I often roll more than one quilt on a noodle and top it all off with a covering of muslin.  In my closet I stand the rolls upright on the protruding ends of the swim noodles.

I place fragile quilts in acid-free boxes and use crumpled, washed muslin instead of tissue paper to stuff in the quilt folds and to wrap them to protect them from contact with the box.

Situations you want to avoid include contact with raw wood (including cedar chests—wrap the quilt), plastic that isn’t museum conservation-quality, damp places, dirty/smelly places and anywhere temperatures get extremely hot or cold. And don’t stack quilts more than three or four deep.

In whatever situation you store a quilt, it is important to take it out every several months to examine it for insect damage and to air it—and enjoy it.

The first 11 parts of this series are available at this website.

Drying Quilts

2016-03QuiltDryBarbGorges11

It’s best to dry quilts flat on carpet protected by a sheet. Photo by Barb Gorges.

Drying quilts: How to Help Your Quilt Live to 100, Part 11

By Barb Gorges

A wet quilt is a delicate thing. The larger it is, the heavier it is and the more carefully it must be treated to make sure the weight doesn’t break quilting stitches. However, a heavily machine-quilted quilt is probably stronger than one with widely-spaced or hand-quilted lines of stitching.

It’s best to air dry quilts flat. I lay a clean sheet over polyester or nylon carpet and then spread the quilt, squaring it up, blocking it. Here in Wyoming, even quilts with cotton batting are dry in a few hours. If necessary, set up a fan.

But if I use the “max extract” option on my washing machine, the quilt is so compressed by the end that I opt to toss it in the dryer on very low heat or just air for 10 minutes to loosen it up and make it easier to spread. Some quilters, before the quilt on the floor is completely dry, will pop it in the dryer to fluff it.

If you think any of the fabrics might bleed (you didn’t make the quilt or you didn’t take steps in Part 4 to check fabric washability), forget air drying—put the quilt in the dryer immediately, before the dyes have a chance to migrate. One reason we avoid using the dryer is to lessen wear and tear on the quilt, but I think a stain from a bleeding fabric is worse.

Line drying is very hard on a quilt, especially if it’s large and clothespinned. Stitching may break. However, a hard-used crib quilt will be just fine on a line. For other utility quilts, if you have multiple parallel clotheslines, you could spread a quilt out over all of them. Be sure to wash the lines or cover them with a sheet first. And maybe put a sheet over the quilt to protect it from passing birds.

The first 10 parts of this series are available on this website.

Washing Quilts

Quilt washing

Front-loading washing machines make washing quilts easy, but top loaders can be adapted. Photo by Barb Gorges.

Washing quilts: How to Help Your Quilt Live to 100, Part 10

By Barb Gorges

From Part 9 we have the list of what we need before putting a quilt in a washing machine: color-fast fabric, Shout color-catcher sheets, quilt in good repair (not fragile antique), stains treated, Orvus soap–either from the feed store or the quilt shop, and clean front-loading machine.

Don’t use other laundry products such as bleach or fabric softener.

Orvus soap is a white solid at 65 degrees. Even if it’s warm enough to be a liquid, mix it with half a cup of warm water before pouring into the soap dispenser. A tablespoon is enough for a queen-sized quilt. Use less for smaller quilts–too much and you will be rinsing forever.

Set the machine for cold wash, cold rinse, and hand wash cycle—or the lowest amount of “agitation” possible. Add an extra rinse or plan to send the quilt through a complete wash cycle again without soap. The “Max Extract” spin setting is good.

For top loaders, fill with lukewarm water. Mix in the soap. Turn the machine off and add the quilt. Use your hands instead of the agitation cycle for a few minutes, gently lifting and moving the quilt. Then let the quilt soak 10 minutes before setting the washer controls for the rinse cycle. Substitute your hands again for the agitation in the rinse cycle, then let it spin.

With either machine, when finished, check immediately to see if there was any bleeding. If so, treat with stain remover and rewash immediately (and recheck immediately again)—and plan to dry that quilt fairly quickly in the dryer.

Otherwise, check to make sure the quilt doesn’t sound soapy. If in doubt, run it through another washing again, without soap. Next issue we will discuss the finer points of drying quilts.

Scroll down to read the first nine parts of this series.

Preparing to Wash Quilts

Orvus quilt soap

One of the best and most widely available quilt soaps is Orvus. Photo by Barb Gorges.

Preparing to Wash Quilts: How to Help Your Quilt Live to 100, Part 9

By Barb Gorges

You’ve done your best to keep your quilt dirt-free (Part 5) and you’ve aired it regularly to keep it smelling nice (Part 8), but now it needs to be washed.

If you made the quilt, you already tested the fabrics for washability (Part 4). But if you didn’t make the quilt, and it has never been washed before, do a test for bleeding on these kinds of fabrics: color saturated, especially red and dark blue; any hand-dyed; and cheap fabrics.

Wet a piece of white cotton fabric and rub it on the potential bleeder to see if the dye transfers. It doesn’t necessarily mean this excess dye will transfer to the rest of the quilt, but you’ll want to treat the quilt as if it would.

If the quilt is well-used, be sure to inspect it for any damage and sew up any tears and patch any holes. If this is a valuable antique quilt, let the experts repair the quilt (or instruct you on how to do it). However, the washing directions here are not for antique or fragile quilts.

Find soap. It should be free of perfumes and additives, like Orvus quilt soap. If you might have bleeding problems, get a box of color catcher sheets, such as the Shout brand, and use multiple sheets per quilt.

Find a front-loading washing machine. Avoid a commercial machine used for washing oily clothes or that has soap residue (run it empty to see if suds develop). A nearby dryer capable of very low heat settings is useful. Chlorine-free water would be nice.

What you won’t need are bleach, fabric softener and any other laundry aids–unless the quilt has a stain. Then try one of the spray-on stain removers.

Scroll down to read the first eight parts of this series.

Freshening Quilts

Quilt freshening

A little time with a damp cloth in a dryer on low heat will freshen a quilt. Photo by Barb Gorges.

Quilt freshening: How to Help Your Quilt Live to 100, Part 8

By Barb Gorges

Quilt care directions seem to be synonymous with quilt washing instructions for many people. But when does a quilt need washing? When it has actual dirt on it, actual body oils.

Quilts can often smell musty after being in storage, but that doesn’t mean they need washing. Each washing shortens the lifespan of a quilt (however, grit can cause fabric wear).

Sometimes, all a quilt needs is a good airing. If it has been folded up, lay it out on a bed. Maybe open a window to get some cross ventilation.

If it is too smelly for indoor airing, go outside. Find a shady place to lay a sheet on the lawn, with the quilt on top, and another sheet over it—to protect it from the birds. This is supposing you have a nice lawn and the wind isn’t blowing.

Resist the temptation to put your quilt on the clothesline—it’s hard on the stitching, although today’s densely machine-quilted quilts are probably up to the task. I have multiple parallel clotheslines I can lay a quilt over—but I need to clean the plastic-coated lines first. Using a protective sheet on top is a good idea.

But company is coming and you don’t have time to lay the extra quilts outside for the day. So try this if the quilt is colorfast: Wet two or three colorfast hand towels and throw them and the quilt in the dryer on a low heat setting, or even just on air. If the quilt gets too damp, remove the towels. If you are fond of the smell of dryer sheets, add one, or sachets.

Moist, low heat in the dryer also helps take out fold marks and removes pet hair, allowing you to put off washing for a little longer.